Drawing chemical structures is one of the most important parts of my job. For me, although I love using LaTeX, the best tool for doing this is graphical: ChemDraw. There are a few reasons why I favour using ChemDraw over other approaches. Most importantly of all it produces the best output I know of (although ChemDoodle is pretty close). Complex structures are hard enough to produce and edit with a graphical tool, and the challenge of using a text-based approach makes this even more tricky. Finally, it’s what my colleagues use, so there is some realism involved.
On the other hand, you always need to be ready to try new approaches, so I’ve been meaning for a while to look at the new-ish ChemFig package, which is based on TikZ. I’m starting as a lecturer next month, so with some teaching material to prepare as an incentive I’ve decided to take another look at ChemFig. I’m going to take two or three posts to look at how I’ve got on. I won’t spoil the conclusions, but I think it’s worth saying now that I won’t be moving from ChemDraw just yet for my research work!
The target
As a first target, I decided to try to reproduce a structure I’m going to need to draw for some practical hand-outs. My favoured settings for ChemDraw are those used by the Royal Society of Chemistry, which are set up for 7 pt text to match 9 pt body text in two-column journals. I’ll be coming back to these settings a bit more in the second part of this mini-series, but for the moment let’s see what the result looks like:
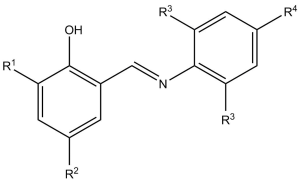
The aim is to get this ‘right’, working out first how to get the structure correct using ChemFig, then get the finer points of the appearance right. In this post, I’ll tackle the basic connectivity, and in the next one how to match the appearance.
Rings and chains
As you’d expect, the ChemFig manual covers how to produce structures in some detail. Here, I’m going to look very briefly at the syntax needed to get us started. Rather than repeat myself multiple times, I’m using a simple LaTeX document
\documentclass{article}
\usepackage{chemfig}
\begin{document}
% Content here
\end{document}
for all of this.
The basic command we are going to need is \chemfig, which takes a single argument: a description of the structure required. As you might expect, this can take a bit of getting used to. For example, a benzene ring is
\chemfig{*6(-=-=-=)}
which comes out as
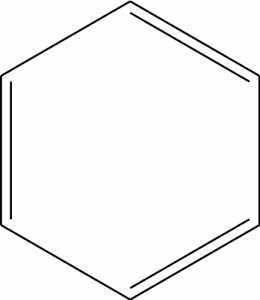
The syntax here is reasonably clear: * makes a ring, 6 means it’s a six-membered ring and -=-=-= is the bonding pattern in the ring.
If we just wanted a linear structure, we could omit the ring part with \chemfig{-=-=-=} giving

Decorating the ring
Adding substituents is not too hard once you work out that the first position on the ring is not the bottom but is the lower of the two left-hand atoms, and that the sequence runs anti-clockwise. The parenthesis in the ring part above might give you a clue that they are used to define groups inside the structure. So the left-hand ring we want is written
\chemfig{*6(-(-R^2)=-(-)=(-OH)-(-R^1)=)}
and gives
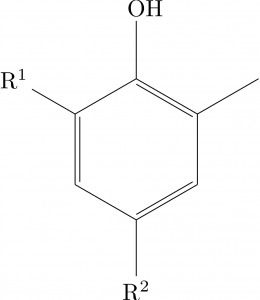
Hopefully the pattern is reasonably clear: you need to have a - inside the parentheses to have the bond coming off the ring, and can use ^ for superscripts in the usual TeX way.
Completing the structure
The same scheme applies to constructing the rest of the molecule: you can put one ring as a substituent on another, and can have an atom in a chain simply by including the atom name ‘in place’. However, there’s a slight issue, as
\chemfig{
  *6(-(-R^2)=-
    (-=N-*6(=(-R^3)-=(-R^4)-=(-R^3)-))
  =(-OH)-(-R^1)=)
}
is not quite right:
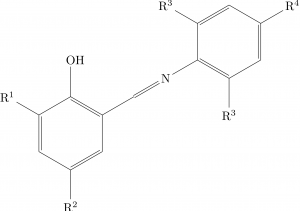
As you can see, the bond angle in the chain part is wrong: ChemFig does not ‘auto-stagger’ things. Of course, this is a pretty basic requirement, so there is a syntax to set the angle of a join: [::-60] will set the relative angle to 60 degrees clockwise, and all will then be well.
\chemfig{
  *6(-(-R^2)=-
    (-=[::-60]N-*6(=(-R^3)-=(-R^4)-=(-R^3)-))
  =(-OH)-(-R^1)=)
}
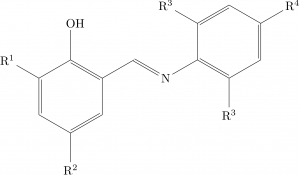
That completes the connectivity we want, and as you can see the input is starting to look a bit frightening (see my comment at the start of the post). It’s also not great looking compared with the ChemDraw reference version: in the next post, I’ll see how that can be addressed.